Adjust Front Derailleur: Let’s put it this way, you are cycling to the top of a mountain alone, on your favorite MTB, enjoying the views and scenery, but suddenly, you notice that the pedal consistency has changed. Lowering the gear doesn’t help, and the next thing that comes to your mind is the chain. Immediately, you stop the cycle and check the front derailleur; unfortunately, the front derailleur has changed its position and angle slightly. You’ve covered half the ground; you either move forward by readjusting the front derailleur or go back before the chain falls off, leaving you on foot. Sadly, you have no tools and no idea about the front derailleur adjustment, so you must cancel the climbing. Apart from this, you have to spend money to adjust it, which is another burden; generally, it costs around $25. However, if the housing and the cable are to be replaced, it will cost from $50 to $700, depending on the variant and product quality. It is important to note that cycling without front derailleur adjustment can lead to cable tension or improperly tensioned cables, consequently more significant repairing costs. Cycle maintenance should be the priority for every cyclist as it links to cyclist safety.
The situation would have been different if you knew about the readjustment of the front derailleur. Not only have you completed the tour, but you’ve also saved money and misery. I understand that learning such things is a bit complicated, but not anymore. I will take you through five steps procedure, after which the derailleur will be back in position with the correct angle, bringing back the same ride experience you wanted. Moreover, the procedure mentioned below is as simple as it could be, and I mean it. All you need is a few tools, and you must always carry these tools whenever going cycling next time. The front derailleur usually needs a checkup after every 100miles, but it can move anytime, depending on the usage, especially for the mountain bikes. Therefore, keep your toolkit along to save yourself from such a nightmare. The toolkit must have the following tools:
- Wrench to tighten the clamp
- L and H screws need to be screwed; thus, a screwdriver.
In Adjust Front Derailleur there are seven steps which covered these adjustment:
Front Derailleur’s Height Adjustment
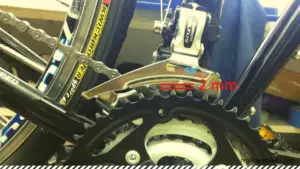
Begin by inspecting the two primary variables of derailleur mounting: cage height over the chainrings and cage rotation relative to the chainrings. The height should be checked with the lower edge of the outer cage directly over the largest ring. Here, pull the shifter or cable to line up these two planes. It is important to note that the closest gap between the teeth and the adder cage should be two to three millimeters. Use a hex as a gauge to adjust the placement. When the cage is set too high, you risk the chance of the chain falling off the largest ring when you shift. However, on the other hand, if the cage is too low, it may rub against the teeth of the largest ring or even the next ring down. While adjusting the height, also inspect the cage rotation to address both problems at the same time.
Front Derailleur’s Angle Adjustment(Adjust Front Derailleur)
It is perfect rotation when the outer cage of the adjust front Derailleur is parallel with the chain ring. Manufacturers have different mounting systems. Clamp-style derailleurs allow both rotation and height adjustment. However, before adjusting the clamp style derailleur, a tip is to note where the clamp is on the tube. Loosen the mounting bolt and move it up or down as needed. Keep in mind also any changes needed in the rotation. Secure the mounting bolt and inspect the cage. This braze-on style is found on road bikes and allows for height and rotation adjustments. Like the high direct mount system, the E2 system has no independent rotation adjustment but allows height adjustment.

Check the cable tension
Adjust Front Derailleur, The Cable tension is another common issue with the front derailleur. Over time, the cable may stretch, causing the derailleur to shift poorly or not at all. To check the cable tension, shift the chain to the largest chainring and the smallest cog on the rear wheel. Pull the cable tight by hand and tighten the cable clamp bolt on the derailleur.
“L” Limit Screw Adjustment
After derailleur mounting has been inspected and adjusted if necessary, move on to setting the limit screws. The limit screws stop the derailleur from moving too far inward or too far outward. When adjusting limit screws, the idea is to view the cage and the chain and adjust so the gaps between them are as small as possible, but without chain rub and with good shifting. We will start by shifting the “L” screw or the “Low Limit” screw (Adjust Front Derailleur).
The front derailleur is to be shifted to a smaller ring. If the limit screws are not marked, pick one and turn it while watching the cage. The L screw will cause some cage motion. Now, shift the rear derailleur to the largest rear sprocket. As the rear derailleur shifts, notice the chain to the inner cage gap gets smaller and smaller. Next, we need to check the shifting cable. A taut cable can create a false inner limit. If the cable is taut, turn the barrel adjuster clockwise, one or two revolutions, to slacken it. This is temporary, and its position will be restored later accordingly. Slight from above and slowly spin the crank. Tighten the L screw to make this gap smaller until the chain rubs against the cage. Now, loosen the L screw in small increments until there is no more rub. Time to restore the position of the barrel adjuster. Shift outward one ring and back to the smallest ring. If the chain shifts back adequately fast, the L screw setting is done. However, if you observe a noticeable delay in getting the chain to drop down to the smallest ring, turn the L screw out one-quarter and try the shift again. The idea here is to have the smallest chain-to-cage gap that you can get away with but still have a good shifting. This is because a large gap increases the chance the chain will drop off the smallest ring during the shift.
“H” Limit Screw Adjustment
The H limit screw setting is similar in concept to the L limit; however, here, we are looking for a small gap between the outer cage and chain. A large gap increases the chance the chain will drop off the largest ring during a shift. Setting the H limit can be confusing since the spring in the body constantly pulls the derailleur inward. Therefore, to test our outer limit screw adjustment, we will need to use our shift levers to apply constant outward pressure. Shifting the chain is the first step to the smallest rear cog and shifting the largest front chain ring. The cable is extremely slack if the chain does not make the shift at all. Turn the barrel adjuster counterclockwise and try the shift again. If you run out of turns at the barrel adjuster, carefully rethread it back in. Turn it fully in and back out a couple of turns. Return the shifter to the inward position and pedal to get the chain under the smallest ring, which matches the shift lever position to the derailleur’s position. You need to shorten the cable at the pinch bolt. If it still doesn’t make the shift, the H limit screw may be too tight. Try turning the screw counterclockwise a few turns. Now that we are on the largest ring loosen the H limit screw a couple of turns. We will intentionally make the H limit screw loose and back it down until it is just right. Tighten the screw until you have achieved a gap of roughly one millimeter. Now, turn the crank to ensure the chain doesn’t rub – as some chainrings wobble. Moreover, continue to apply constant pressure to the shifter. Test the H limit setting by shifting to the next smallest ring and then back outward. Press fully on the shifter during the shift to simulate good cable settings.
If the shift seems slow, or the derailleur cannot make the shift, even with full pressure on the lever, the limit is too tight. Loosen no more than one-quarter turn and try the shift again (Adjust Front Derailleur). If the chain shifts over the largest chain ring, or nearly over, the H limit is very loose. Tighten no more than a quarter turn and try the shift again.
Maintenance Tips for Front Derailleur
| Keep the derailleur clean and lubricated (After the Adjust Front Derailleur) |
| Check cable tension periodically |
| Replace worn or damaged cables or housing as needed |
| Inspect derailleur for signs of wear or damage |
These maintenance tips are essential for keeping your front derailleur in good working order. By following these tips, you can ensure that your derailleur is functioning smoothly and efficiently, allowing you to shift gears with ease. Adjust Front Derailleur of Mountain Bike is a very important step overall.

Indexing Adjustment
The idea of index shifting is to put the cage in the correct position relative to the chainrings. This is done by adjusting the barrel adjuster. Some lever systems may have two to three positions, while others have multiple clicks. However, the process is the same. For systems with index shifters but no barrel adjusters, the adjustment is made by shortening and lengthening the cable at the pinch bolt. We will find the correct cable setting by intentionally introducing movement at the cage and then systematically removing it. Movement at the cage tells us that the linkage is not contacting the H limit screw, and when the movement is gone, we know our cable setting is just right. Push on the shift lever; if there is no movement at the cage, turn the barrel adjuster clockwise to effectively lengthen the cable. Push on the lever and repeat until there is slight movement. Once you notice the movement, turn the barrel adjuster counterclockwise one half-turn and test by pushing on the shift lever. Repeat this until the cage doesn’t move outward when the shift lever is pushed. The index setting is now complete.
Congratulations! Cyclist on learning a new skill of adjusting the front derailleur. No more cancellation of plans; you are all covered with just a screwdriver and wrench.