Adjust Rear Derailleur
When it comes to shifting, professional cyclist expects nothing but perfection since it is the main element that holds the potential to increase their average speed, maneuvering ability over the sharp edges and rugged terrain, building confidence, and more. For a day-to-day commuter cyclist, shifting is slightly less important compared to a professional cyclist, but it still holds a significant point. Imagine, on the way to the office; the inferior shifting starts causing your drivetrain to skip, hang, or mis-shift between pedaling and shifting. The majority of the individuals are trying to make it on time in the morning, and facing such a problem in such a hurry could be devastating.
In this blog, I will take you through the reasons why inferior shifting occurs or what causes the shifting to lack. It is important to note that mostly it is the rear derailleur adjustment that affects the drivetrain and shifting; however, there are a few other things that must be checked before adjusting the derailleur, which can save time and money if you get it fixed from a cycle mechanic. The derailleur adjustment requires the overall adjustment of limit screws, pulley, and tension screws with respect to chain and cyclist requirements; therefore, the following things must be considered before getting deeper:
Chain Wear
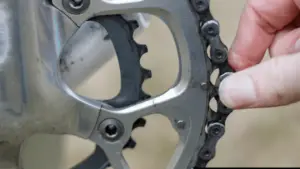
The chain is kept in holding by the pins and rollers, which keep it in place. If the chain misses or skips, it means that the chain wear needs to be checked. The chain wear or stretch occurs over time, and it is inevitable. You can slow down the process by maintaining the chain and riding smoothly over rugged terrain to increase the life of the pins and rollers. If the chain wear is left unnoticed, the drivetrain will be damaged, and it will cost way more than the chain. Therefore, timely maintenance is required.
Damaged Cables and Housing
Check the housing from where it connects with the shifting levers. If the housing is internal, then check from the front where possible. You might need to inspect the entire housing for diagnosis. Usually, the cables and housing become the reason for the shifting crisis. The frayed cable, secured at the bold and bend at the derailleur, needs to be replaced for better and improved shifting.
Bent Derailleur Hanger

Since the derailleur hanger is made of soft metal, any fall or sudden hit can make it bend, which can affect the shifting and spokes. A bent derailleur hanger can cause the spokes to break, or it can break the derailleur too. The hanger should be parallel to the cassette’s cog. If you notice even a slight bend, use the hanger alignment gauge to adjust the position back to its original place. Replace it if the tool is unable to restore the original position of the hanger.
Shifting problems can be like not reaching all the gears, or maybe it is not making sorts of noises. Whatever the issue, regardless of the make or model, this blog about the rear derailleur adjustment will help dial the shifting problem for optimal performance. Before beginning, a quick overview of the components and procedures must be known by the cyclist for a clear understanding of the adjustment procedure.
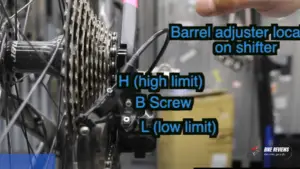
The rear derailleur is the mechanism that shifts the chain at the rear cogs. The derailleur is connected to the shifter by a cable that passes through the housing. Bikes commonly use an index shifter that moves the cable in small predetermined increments with each click. Inside the derailleur body is a spring that constantly pulls the derailleur outwards. The cable constantly holds against that spring in various shift positions. Derailleurs are fitted with limited screws that stop the derailleur from moving too far inward and too far outward. The function of limit screws is to prevent the chain from going into the spokes or into the frame. The first procedure of rear derailleur adjustment is the H limit adjustment. And after that, it is indexing. Indexing is the process of lining up our guide pulley with the cogs so that each shift lines up with each cog.
The barrel adjuster – located here or up at the shifter – allows moving the shift increments. Following indexing, it comes to screwing the other limit screw. Following that comes the adjustment of the B screw. The entire procedure of rear derailleur adjustment is mentioned below in four easy parts, so before heading to it, make sure the availability of a screwdriver or hex wrench for limit screws and a repair stand for some way to hold the bike up so to check the adjustment along with pedaling.
The Four Portions Of Rear Derailleur Adjustments Are:
1. H-Limit Screw Adjustment
The aim is to dial the H-Limit screw as close as possible to the inward cog. Sometimes the limit screws are unmarked, and the way to identify them will be explained later. To begin this portion, take a look at the derailleur hanger, and if it is clearly bent, use the gauge to readjust the hanger parallel to the cog. If it is not restored back to its original position, the derailleur hanger needs to be replaced; otherwise, it will affect the drivetrain.
If the bike has multiple front chainrings, shift the front derailleur to the largest, and shift the rear derailleur to the smallest cog. Even if the rear derailleur is on the smallest cog, keep on clicking until there are no more clicks. It ensures that the shifter is fully actuated outward. If the change doesn’t shift to the smallest cog, it is likely being stopped either by the limit screw or the shift position. First, turn the H-Limit screw counterclockwise a few turns. Pedal and see if it makes the shift outward. If it is not shifting outward, turn the barrel adjuster clockwise a few rotations. Now, pedal to see if it shifts to the smallest cog; it can be noticed there are no more clicks. Turning either barrel adjuster one clockwise, a couple of turns add slack to the cable. It keeps the confusion away from the shift position with the limit screw settings.
To differentiate between the L and H screw, pick one and turn it in and out while watching the derailleur. If the derailleur doesn’t move, try the other one. The H-limit screw will cause some motion at the derailleur. The correct setting will be found by purposely making it too tight, turning it back to normal and ensuring the perfect position to stop the screw from loosening. The perfect position can be observed by the noise made by the chain. If the noise is too high, the H-limit is tight; otherwise, loosen it to get a perfect adjustment. In some cases, an overly tight limit screw can cause a shift to the next cog, which is another indicator to loosen the H-limit screw. The H-Limit Screw is now set.
2. Indexing Adjustment
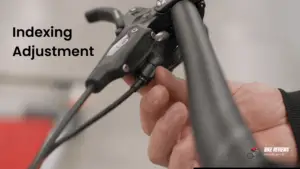
Turn the barrel adjuster counterclockwise a couple of turns; getting it back to where it was shouldn’t be a concern for now. The barrel adjuster allows us to make these adjustments. It should be noted that there is a range of acceptable adjustments, meaning there could be more than one-barrel adjuster position that results in good shifting performance. If there are two front chainrings, stay on the largest, and if there are three front chainrings, shift to the middle. On the rear, we start on the smallest cog. Pedaling at a normal riding cadence, shift the rear lever with only one index click. It is important to note that there are designs that click multiple times with one push on the lever, so push the lever slightly until one click is heard. One-click is required to shift one and only one gear. If the chain does not make it to the next gear, return the shift lever to the outermost click, and turn the barrel adjuster one full turn counterclockwise. Try making the shift until it makes the shift.
If the barrel adjuster is unthreaded because of too many turns, thread the barrel back in fully and then out one or two turns. It should be ensured that the barrel is on the furthest outward shift position and the smallest cog. After the barrel is adjusted, remove the slack from the cable at the pinch bolt by turning it fully. There is a possible scenario of one click moving the chain two sprockets away, but the procedure is closely the same.
As the chain has moved to the second sprocket after one click, the shifting can be fine-tuned. The procedure is to move the barrel adjuster counterclockwise until it is clearly out of the acceptable range and then slowly tune it back to the perfect slot. To observe the perfect position, noise is the perfect indicator. Too much noise indicates that the barrel adjuster needs to be turned either counterclockwise or clockwise as per the situation. To double-check the indexing adjustment, check the source of excessive noise, which should be the chain striking the next inboard cog. Repeat the process until the noise is gone. If you hear noise in any one cog, turn the barrel adjuster clockwise a quarter turn, and test the shift to that cog again. Repeat and continue to check until the barrel adjustment allows good shifting in every rear cog, with the exception of the largest cog.
3. L-Limit Screw Adjustment
Similar to the H screw setting, we make the L screw too tight, and then we will back it up slightly until it is just right. It provides the most protection from the derailleur taking the chain past the largest cog and into the spokes. Shift the chain to the next-to-largest chainring in the front, and shift to the second largest cog in the rear derailleur. To find the limit of the screw if it is too tight or too loose, shift to the largest cog for a slight assumption.
If the chain does not make the shift, the L screw is already too light. On the other hand, if the chain shifts slowly to the largest cog, it is a symptom of the L-screw being too tight. Excessive noise on the largest cog indicates the L-screw is too tight and needs readjustment. However, if it makes an acceptable shift with no excessive noise, the L-screw is not too tight. We will turn the derailleur one click outward, tighten the L-screw half a turn, and try the shift again. Repeat the procedure until there are no symptoms of excessive noise and delayed shifting. The L-Limit screw is now set. As a check, put extra pressure on the shifter. It shouldn’t move the cage inward, meaning that the L-Limit screw is set perfectly right.
4. B-Screw Adjustment

Most derailleurs have some form of adjustment for the spacing of the G pulley to the cogs. The spacing is maintained by the B-screw, where B stands for the body-angle screw. The adjustment is checked when the chain is on the smallest sprocket in the front and the largest sprocket in the rear. The majority of road and mountain bikes require a gap of between five and six millimetres. Use a hex wrench to gauge the distance between the gaps. It is an exception portion; if the bike is shifting well, the B screw is adequately set. To increase the gap, tighten the B-screw; otherwise, to decrease the gap, loosen the B-screw. If you made significant changes to the B screw, double-check the indexing adjustment. Otherwise, the procedure is done, and the rear derailleur is properly adjusted.
Cyclists must test drive the bike because the stresses of riding on the drivetrain are different than when the bike is in a repair stand. If the symptoms of slow shifting and excessive noise show up, follow the procedure to adjust the rear derailleur, as discussed above in the blog. The barrel adjuster or the limit screws needs to be adjusted another quarter turn, and it will be all perfect. That is it for shifting adjustment!